The Sapphire Web Pack Market Sales allows the user to create new sales orders, process existing orders, and if necessary, create new Clients. Market Sales has been specifically designed for an extremely dynamic sales environment.
Typically, a market stand will be making Sales in the early hours of the morning, and the Sales process will involve a number of Salespeople that have a particular product, i.e. fruit or veg, or a particular line or type i.e. citrus root vegetables, that they will be responsible for.
When the client comes in to make the transaction there will be an open order. The idea behind the open order within the Sales screen, is that it give the user the ability to leave that order open for that one customer to go to various salespeople within the market. The Salespeople will then be able to update the open order with additional lines once the order is complete. The potential customer may then make a return to the market stand sometime later after checking and verify prices on other market stands, and they may order additional product or change their order. All that can be facilitated on the open order within the Sales screen once the order is complete.
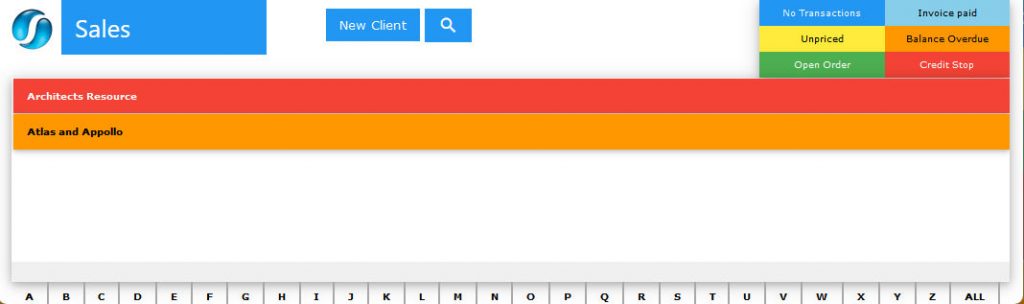
You can then process the order to invoice paid and the colour will change from Open Order (green) to Invoice Paid (pale blue). The Salesperson or the Cashier will be dynamically notified if the particular customer is in arrears with an order Balance Overdue (orange) or on Credit Stop (red). The Sapphire Web Pack Market Sales user can quickly go to the A-Z if there is a large number of Open Orders. The user can use the alphabet icons to click on a particular letter, located at the bottom of the page. For example, by clicking on the letter ‘S’, all the clients that start with ‘S’ within the Sapphire Web Pack Market Sales will appear. This will make it easy for the Salesperson to quickly find a particular customer’s Open Order.
The Sales functionality in the Sapphire Web Pack is for the placing of Sales Orders from your Clients. By default, the system will display only the Client ID’s that commence with A as seen below. It should be noted that throughout the web pack extensive use has been made of colours. Each of your clients will be colour coded as per the six colours, which are as follows: No Transactions (Sapphire Blue), Invoice Paid (Pale Blue), Unpriced (Yellow), Balance Overdue (Orange), Open Order (Green), Credit Stop (Red).
The user now has three options when finding or selecting a Client. These options do vary in how they display the list as it could be displayed on a large iMac down to a smart phone. Pick what suits you best!
- Make a selection for the required Client from A through to ALL from across the bottom of the screen. The Clients with the selected letter as the first letter in their name will be displayed in a larger format list for fingers to select from as on a smart phone.
- Select the button to tell the system to display a pick list of Clients for you to make your selection from. Probably best for a full-size computer screen and a mouse.
- Selecting the
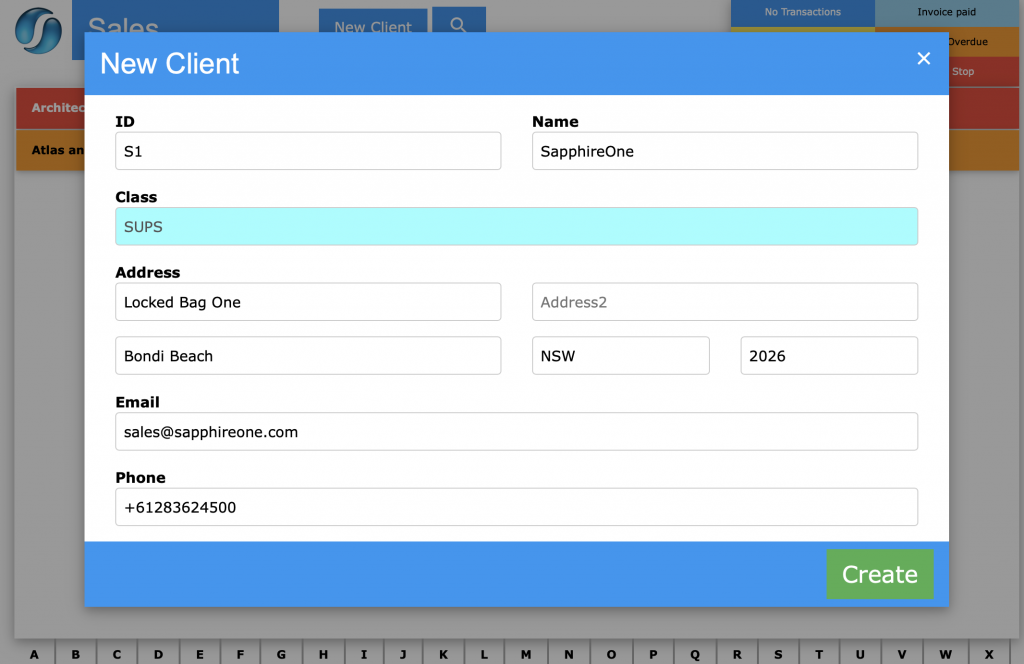
 button will display a New Client pop up enabling the entry of the details for a new Client. Additional details may be entered when back in the office using Client server mode. These additional entries may be credit limit, director’s guarantee, etc. If there is a credit form required and a directors guarantee, this may be signed and attached through Sapphire’s Document Management (DMS) contained within the Client. An email address will be subsequently added and the various contacts of the Client, which is contained within the CRM. Other user defined fields or custom fields maybe also be added, for example, a buying group, a supermarket chain, etc.

Sales (OCI)
This functionality in the Sapphire Web Pack is for the processing of Sales Orders from your Clients.
Screen layout
By default, SapphireOne will initially display the Client ID’s that commence with A as seen below. The user then has the option of selecting a letter from the bottom of the screen to display a list of Clients or customers with the selected letter being the first letter of their ID.
When the ALL item is selected, SapphireOne will then display a list of ALL Client or Customers ID’s currently in the data file as seen below. These are the Clients or Customers from the Bondi Blue data file.
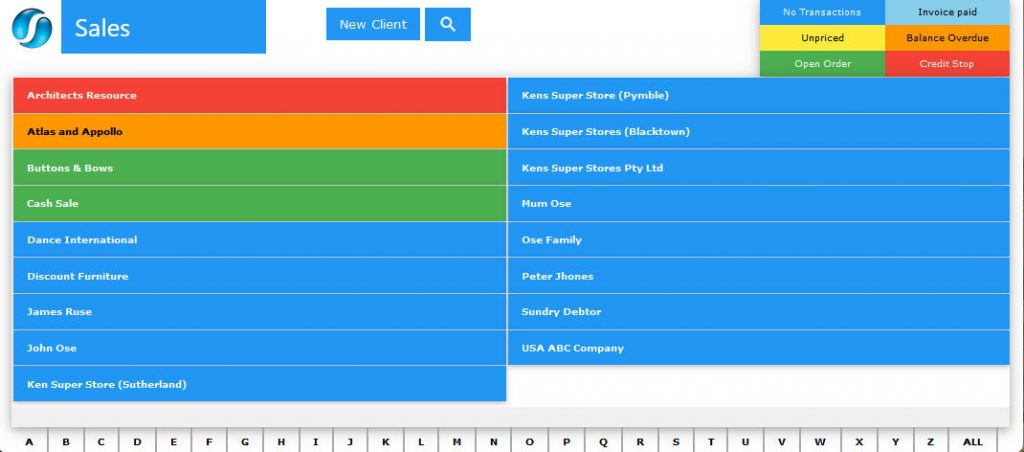
- Colours – It should be noted that throughout the Sapphire Market Web Pack extensive use has been made of colours. Each of your clients will be colour coded as per the six colours seen here.
 Customer currently has no transactions in Sapphire Market Web Pack.
 The produce price is yet to be set.
 The customer has open orders in Sapphire Market Web Pack.
 A recent Invoice for the customer has been paid.
 The customer has a balance that is overdue for payment.
 The customer is currently on a credit stop.
- Client Selection – The user now has three options when finding or selecting a Client. These options do vary in how they display the list as it could be displayed on a large iMac or PC down to a iPhone or iPad, or any device running HTML5 or greater.
- A – Z or ALL – Make a selection for the required Client from A through to Z from across the bottom of the screen. The Clients with the selected letter as the first letter in their ID will be displayed in a larger format list for fingers to select from as on a smart phone. Alternatively, select the ALL button to tell the system to display a pick list of all Clients in your SapphireOne data file for you to make your selection from. The user should be aware that this will be an extensive list in some cases.
- Search Button – When the
 Search Client Icon is selected, SapphireOne will display the alert as seen below. The normal keyword data entry may be used to filter the results of your search, or the mouse used to directly select the Client required from the list.

- New Client – Selecting the button will display a New Client alert enabling the entry of the basic details for a new Client. Additional details may be entered using the SapphireOne Client server mode. Once the data entry for the new client has been completed, select the
 button to save the new client to the SapphireOne data file.
Data Entry
Once a Client has been selected, Sapphire Market Web Pack will display the Sales screen ready for data entry as seen below.
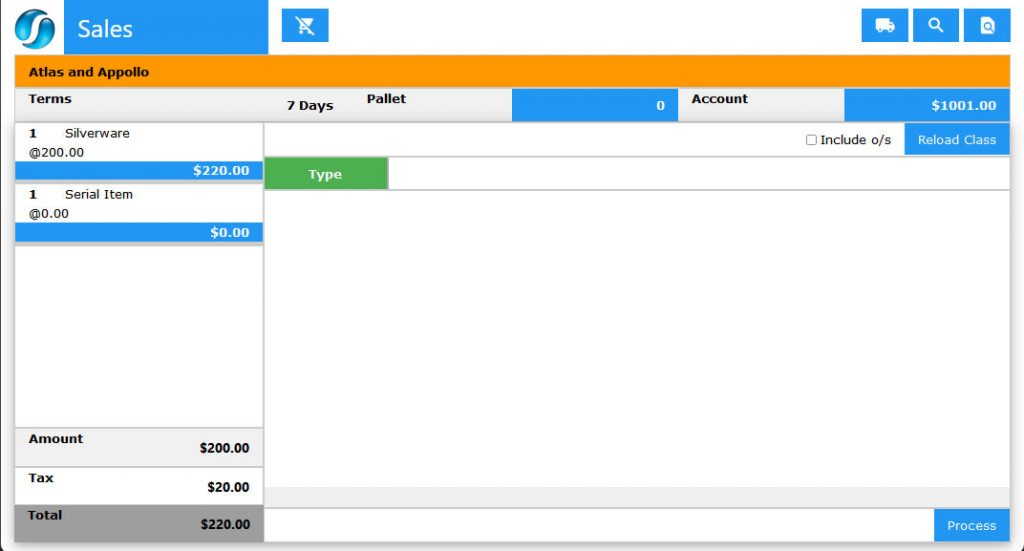
- Icons – There are 4 icons across the top of the screen as follows.
- Shipping & Delivery – The
 Shipping and
  Delivery icons when selected, each display a pop-up allowing the user to enter in Shipping and Delivery details.
- Shipping & Delivery – The
- Inventory Selection – For selecting inventory items for sale the user has two options, and in both cases the system will attempt to automatically offer the complete ID or Name, and for the Serial/Batch number or Name as the user enters characters into the Search Inventory alert.
- General ID Search – When the General ID Search icon is selected, Sapphire Market Web Pack displays the Search Inventory alert. This does an Inventory Search for the Inventory items ID or name, and note that it will also include Serial/Batch items in the list. These Inventory types will be displayed differently for the user to select from as follows.
- Standard Inventory Items – The results are displayed on a location by location basis. The stock levels in each location will be listed allowing the user to select Inventory from any location for sale.
- Serial/Batch Inventory Items – Sapphire Market Web Pack will display all of the Batch or serial numbers allowing the user to select specifically from a Batch or serial number for sale.
- Serial Batch Search – When the
 Serial Batch search icon is selected, Sapphire Market Web Pack is searching for Serial or Batch numbers and not Inventory ID’s or names. The user will have to know all or part of the Serial or batch number to be able to start a search for the required item. Please note that unless the inventory item has its type set as serial or batch it will not be displayed in this type of Serial/Batch pick list. Also, if the user has a Bluetooth
- Serial/Batch items – These Inventory items will be displayed based on their Serial/Batch names and not their Inventory ID’s or names.
- Scanning Barcode/Inventory ID – If the user has a Bluetooth scanner connected to an iPad, iPhone or any device that support HTML5 or greater, or a computer with a barcode scanner attached, they can scan the barcode directly into the data field.
- General ID Search – When the
Dictation and Speech to Text Overview
SapphireOne’s Dictation (MacOS) and Speech to Text (Windows) functionalities revolutionise data entry. These features are available for any data entry field and all inquiry screens within SapphireOne. For instance, when a user makes a call via the SapphireOne Softphone, SapphireOne automatically timestamps the contact and phone number. Post-call, users can dictate notes directly into the CRM contact memo field in relation to the stamp.
This functionality is applicable across all Data Entry screens. As examples, when entering a Vendor Invoice (VI), users can dictate memos directly. Similarly, additional lines can be added to the General Ledger account, with each line having a unique memo field. After an employee interview, users can efficiently dictate notes.
Speech to Text and Dictation are powerful tools that SapphireOne and its clients use daily, significantly saving time.
Posting
Any Inventory based purchases in the Sapphire Market Web Pack must be posted before they will be displayed in this Sales function. Un-posted transactions will not be displayed for selection.
Market Cheat Sheet
- Select Function – Select from the main Sapphire Web Pack menu, Market > Sales.
- New or Existing Client – The user has two options as follows
- New Client – Select the button and enter in the details for the new client and then save the new client by selecting the button
- Existing Client – Use the options that have been provided by Sapphire Market Web Pack and select an existing Client.
- New Client – Select the
- Finding Inventory – Use either the
 General or Serial Batch icons to find the required Inventory item and select them.
 - Adding Inventory – The selected inventory items will displayed under the
 heading in a pick list.
- Alert – As each Inventory item is selected an alert will be displayed.
- Enter the quantity and check the rate and total for the item.
- When all is correct select the
 button and the item will be transferred to the left hand column which displays the current Inventory in this sales transaction.
- Alert – As each Inventory item is selected an alert will be displayed.
- Checking Sales Items – Click on each inventory item in the left hand column and check the quantities as well as the other items on this alert.
- Processing – Once all is correct select the
 button in the lower right hand corner of the screen.
 - Sapphire Market Web Pack will then save the sales transaction and return the user to the Sales screen ready for the processing of another Sapphire Market Web Pack Sales transaction.
You can review our Blog and YouTube channel for additional information and resources on SapphireOne ERP, CRM and Business Accounting software.