Sapphire Web Pack Client Inquiry Overview
Sapphire Web Pack Client Inquiry is the foundation for all revenue-based activities within your Sapphire Web Pack application. Once set up, the Client will serve as the repository for all transactions related to that particular Client, whether they are Inventory Transactions, Job Project-Based Transactions, or Account Transactions. All interactions will be monitored with the inbuilt Client Relationship Management (CRM) within the SapphireOne Client, and a complete history of all transactions is stored for the life of the data file.
Sapphire Web Pack Client Inquiry includes a total of five unique tabs within the Client as follows:
- Details Tab – Stores the Client ID, Name, Address, ABN, Contact Details, Email, Notes, etc.
- Balances Tab – Provides a graphical view plus a list of all current, outstanding transactions.
- Sales Analysis Tab – Offers a graphical interpretation of sales by product or service and an interactive ability to pick a date range.
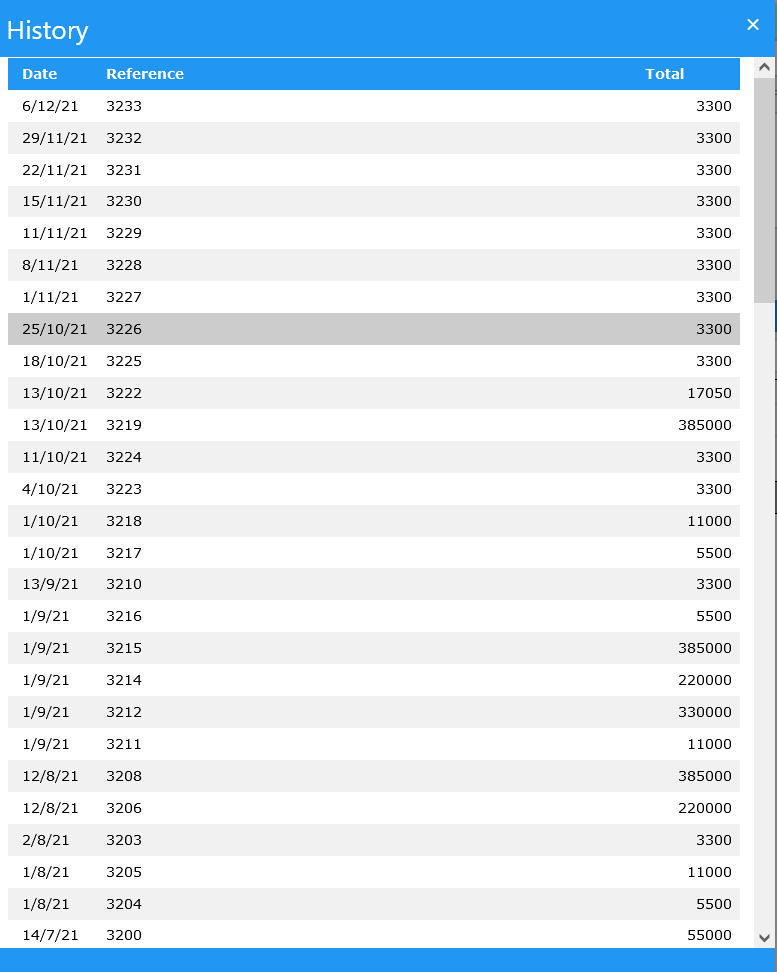
- Sales Tab – Displays all sales from Inventory and Job Projects mode, and it also has the ability to include history.
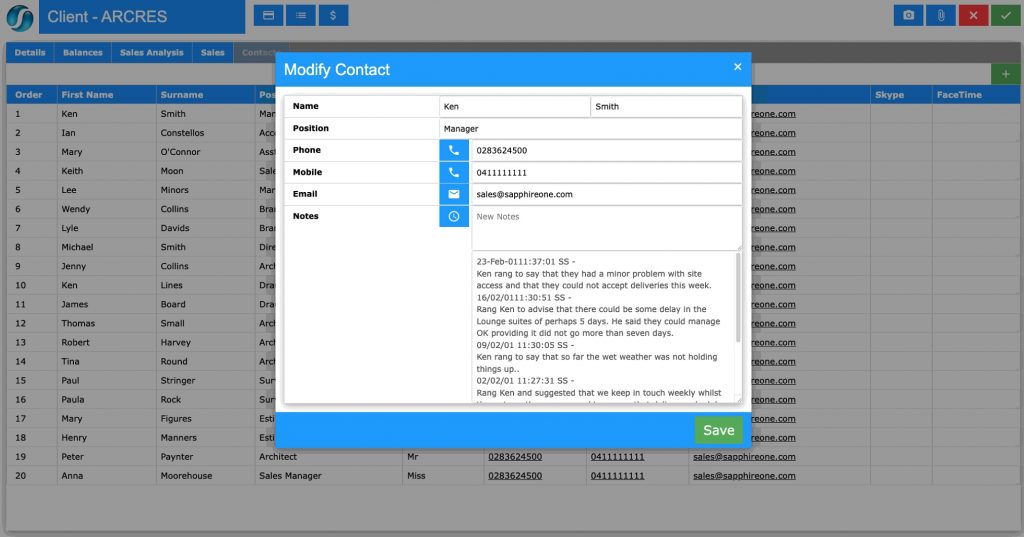
- Contacts Tab – Contains a complete list of all linked contacts to the client, providing full Client Relationship Management (CRM). This function also allows you to select a contact to modify contact details, as well as call or email directly, and add notes.
The functionality also includes access to Document Management and the Camera button for the capture of Digital Assets.
- Documents (DMS) Page – A record of all attached documents to this client.
- Digital Assets Page – Provides unlimited digital asset storage. These may be PDFs, videos, photographs, JPEG, RAW, and HEIC – any type of digital asset attached to your client.
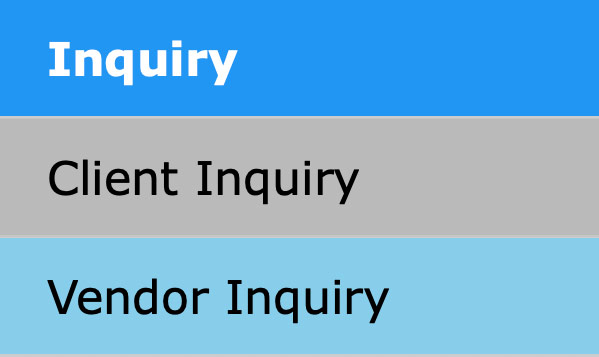
Client Inquiry is contained within the Inquiry mode of Sapphire Web Pack.
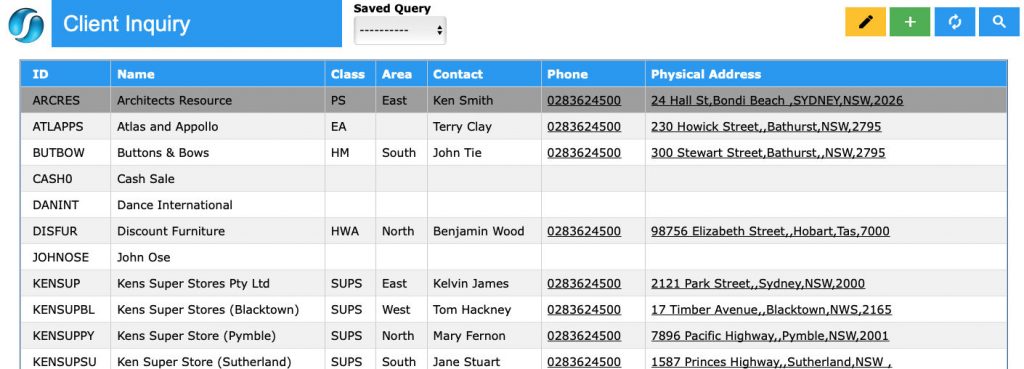
The Client Inquiry function within Sapphire Web Pack displays a comprehensive list of clients that have a master record within the SapphireOne data file.
When opening a Client Inquiry, the user is provided with a list of critical details for each client, including ID, Name, Address, Telephone Number, and Main Contact.
From this screen, the user may create a New Client ![]() , Refresh the list
, Refresh the list ![]() , or perform a Search
, or perform a Search ![]() for a client or group of client records. The View or Modify button
for a client or group of client records. The View or Modify button ![]() will not be displayed until the user selects or highlights a client record, as seen in the screenshot below.
will not be displayed until the user selects or highlights a client record, as seen in the screenshot below.
From the Client screen, a user is able to create a Client Receipt (CR) or view a list of recent orders for the client. The user is also able to create new Quote Client Invoices (QCI), Order Client Invoices (OCI), and Sales Client Invoices (SCI) all from this single Client Inquiry screen.
- Data Entry Buttons – These three buttons
 allow the user to conduct other functions from within the Client Inquiry function in the Web Pack. These buttons are documented later in this article.
 - Picture Button – When the Picture button
 is selected, an alert will be displayed asking the user to select a picture from their local machine.
 - Document Button – When the Document button
 is selected, an alert will be displayed allowing the user to either view existing documents attached to the client record or select the Add button
  to add an additional document to the client record.
 - Cancel Button – Select the Cancel button
 to cancel the current operation and return the user to the Client Inquiry screen.
 - Save Button – Select the Save button
 to save the current record.
Create or Modify a Client Record
This section provides instructions on how to create a new client record or modify an existing one within Sapphire Web Pack.
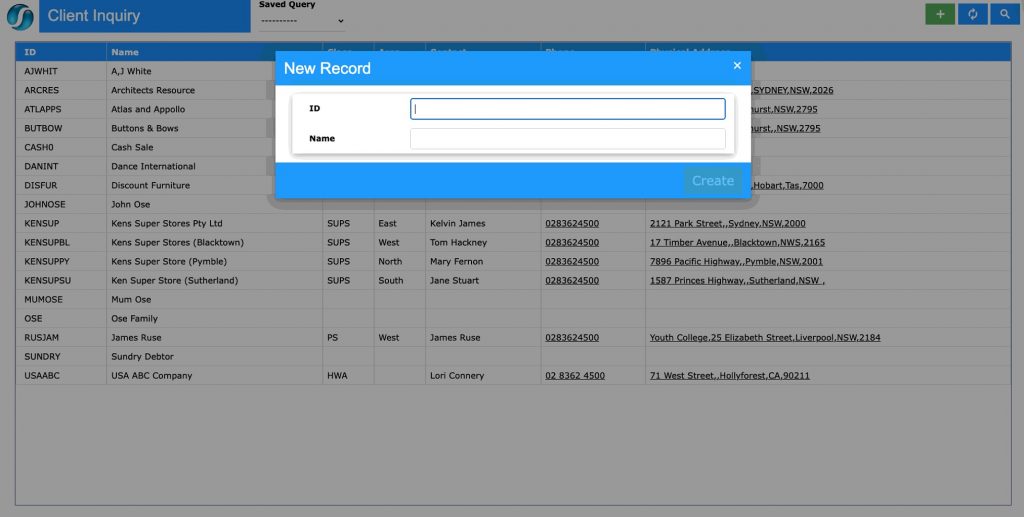
- Create a Client Record – To enter a new client record, select the New button
 from the option menu. An alert will be displayed asking for a new Client ID and the Name of the Client. Once these details have been entered and the user has tabbed forward, the Client data entry page will be displayed.
 - Modify a Client Record – To modify or view an existing client, select the client from the list and then select the Modify button
 .
.
Client Inquiry Details Tab
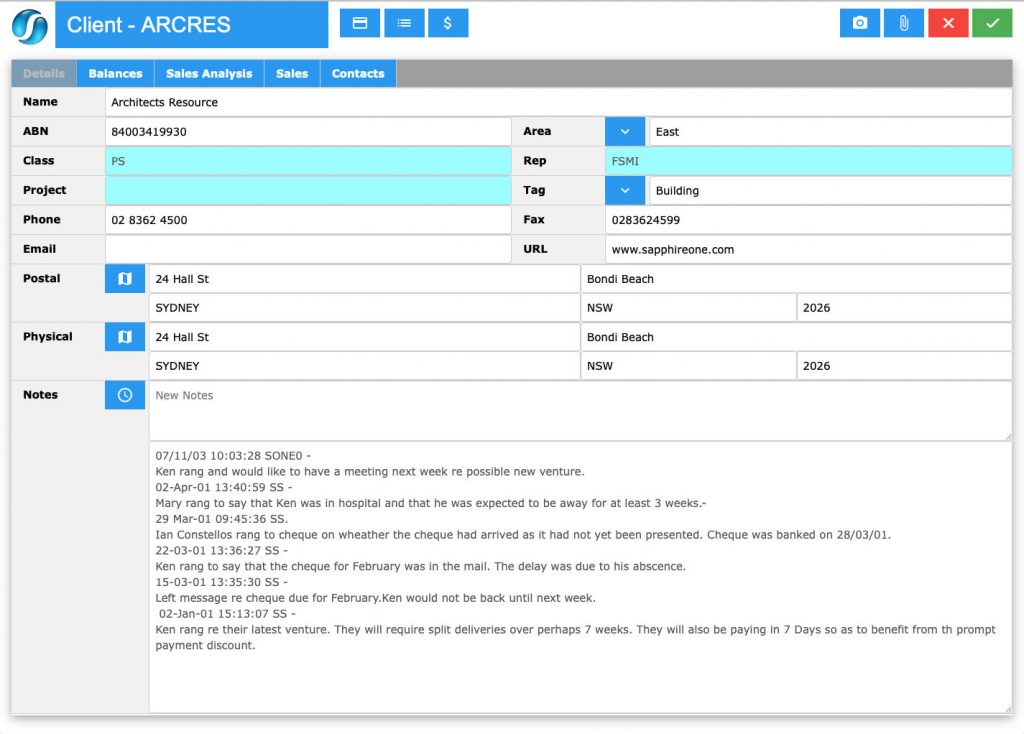
When first creating or modifying a Client Inquiry, the Details tab is the initial screen presented to the user. This area displays essential information about the client, such as the Name, ABN, Area, and Class.
- Name – The name of the client will be entered here. The client name can be modified at any time.
- ABN – The client’s Australian Business Number (ABN) will be entered here if required.
- Area – This data entry field is used for grouping clients for reporting purposes. For example, if you wish to group your clients by a rating system (e.g., 1-9 or A-E), you would use the Area field.
- Class – This data entry field is used to assign the client to a Client Class. Client Classes are important as they may be used for various purposes. For example, you can organise your clients into different classes such as Prospects (P), Inquiry (I), and Client (C) to distinguish and group them.
- Rep – This data entry field is used to assign a particular sales representative to the client. Sales representatives are set up through the Inventory screen. This is also important as sales reps can be limited to only viewing their own clients. This is an optional field.
- Job Project – The client may be linked to a Job Project if a Job Project ID is entered into the data entry field. Job Projects are set up in the Job Project Inquiry screen. This is an optional field.
- Phone – The client’s contact number is entered here.
- Fax – The client’s fax number is entered here.
- Email – The client’s email is entered here.
- URL – The client’s URL is entered here.
- Postal – Both the Postal Address and the Physical Address are hyperlinked fields. When the hyperlink button
 is selected next to the address, the default browser on the local machine will access Google Maps and display the location on their mapping system.
 - Physical – Both the Postal Address and the Physical Address are hyperlinked fields. When the hyperlink button
 is selected next to the address, the default browser on the local machine will access Google Maps and display the location on their mapping system.
 - Notes – Any notes relating to the client can be added here. The user can select the blue clock button to add time and date stamps to the notes.
Dictation and Speech to Text Overview
SapphireOne’s Dictation (MacOS) and Speech to Text (Windows) functionalities revolutionise data entry. These features are available for any data entry field and all inquiry screens within SapphireOne. For instance, when a user makes a call via the SapphireOne Softphone, SapphireOne automatically timestamps the contact and phone number. Post-call, users can dictate notes directly into the CRM contact memo field in relation to the stamp.
This functionality is applicable across all Data Entry screens. As examples, when entering a Vendor Invoice (VI), users can dictate memos directly. Similarly, additional lines can be added to the General Ledger account, with each line having a unique memo field. After an employee interview, users can efficiently dictate notes.
Speech to Text and Dictation are powerful tools that SapphireOne and its clients use daily, significantly saving time.
Client Inquiry Balances Tab
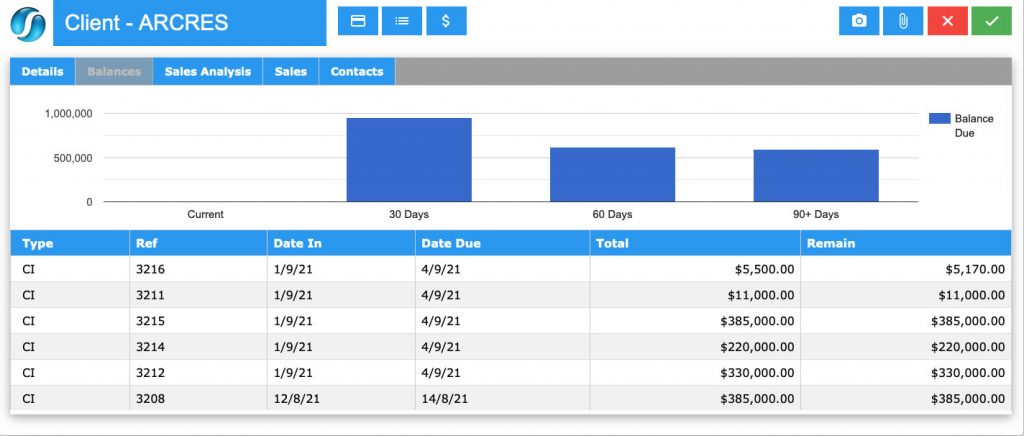
The Balances tab displays the current aged balances for the client. These are displayed as seen above, showing balances ranging from 30 to 90 days, as well as current balances.
Client Inquiry Sales Analysis Tab
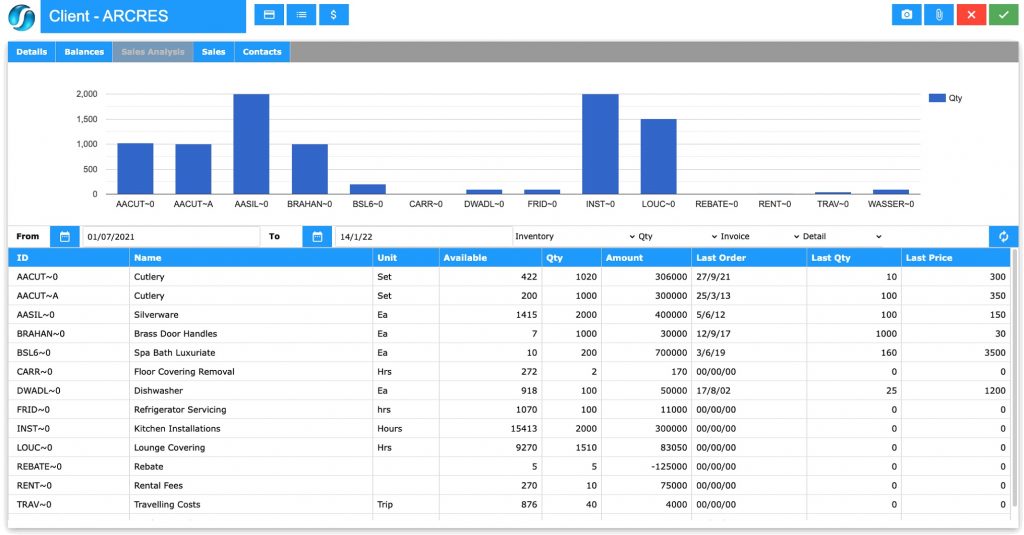
The Client Inquiry Sales Analysis Tab displays the sales analysis for the selected client and related filters.
Client Inquiry Sales Tab
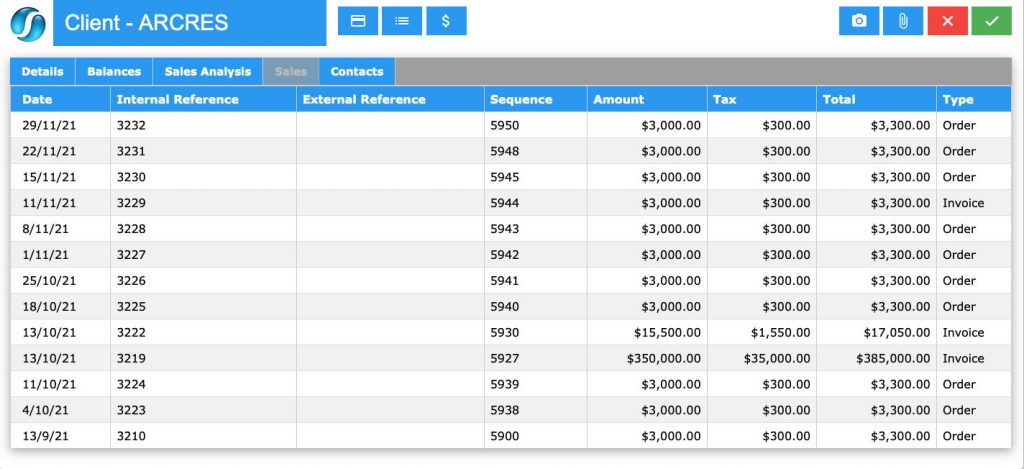
The Sales Tab screen displays all current transactions for the selected Client. It will display all current Quotes (QCI) Orders (OCI) and Sales (SCI).
Selecting a record will open a modal screen for that record, providing the following button options:
- Email Button
 – Email the report to the clients default email address established in their client record.
 - Open Button
 – Open the report in PDF format in the device default application.
 - Modify Button
 – Edit the transaction.

Client Inquiry Contacts Tab
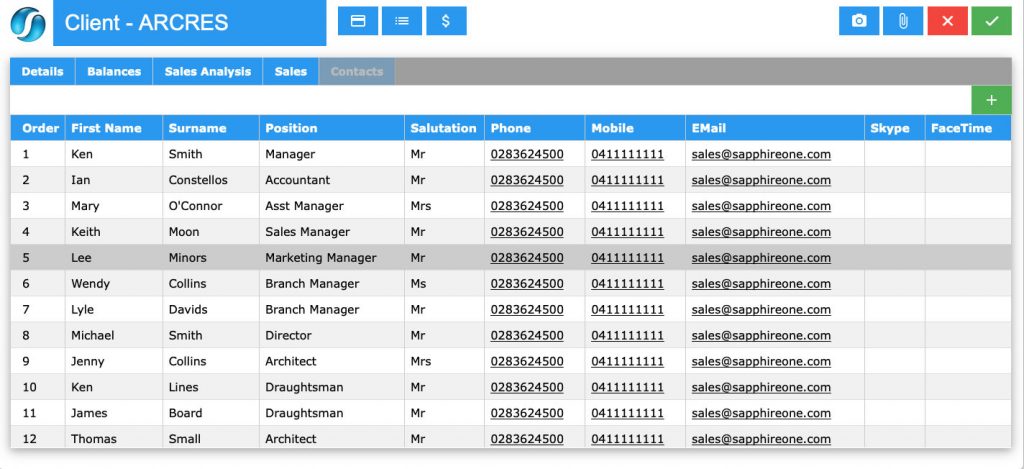
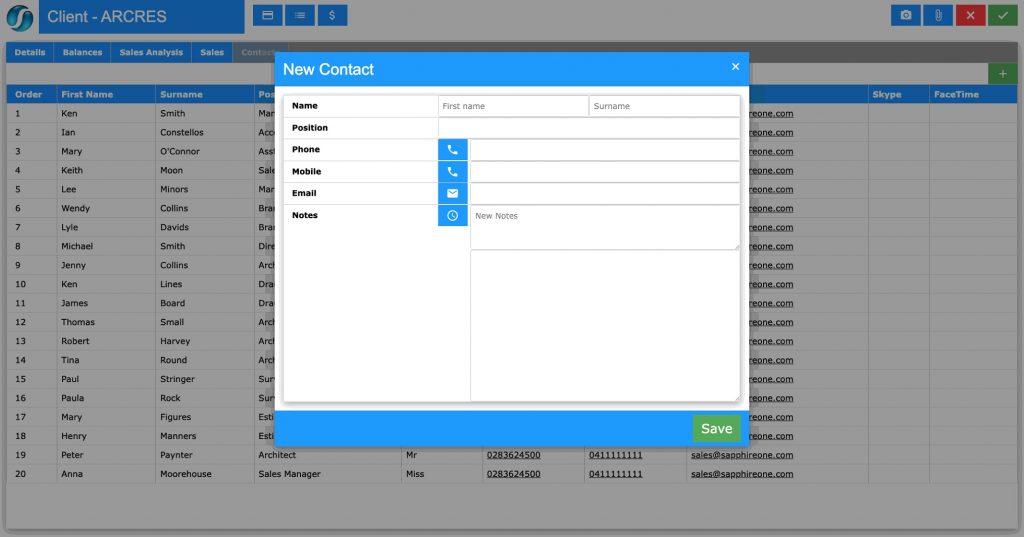
Selecting the Contacts tab displays a list of contacts for the selected Client. New Contacts may be added by selecting the New ![]() button. The modal screen seen below will be displayed enabling the entry of details for the new contact.
button. The modal screen seen below will be displayed enabling the entry of details for the new contact.
Selecting a contact will prompt SapphireOne to display a modal screen, enabling notes to be added to the selected contact as seen below.
Pictures Page
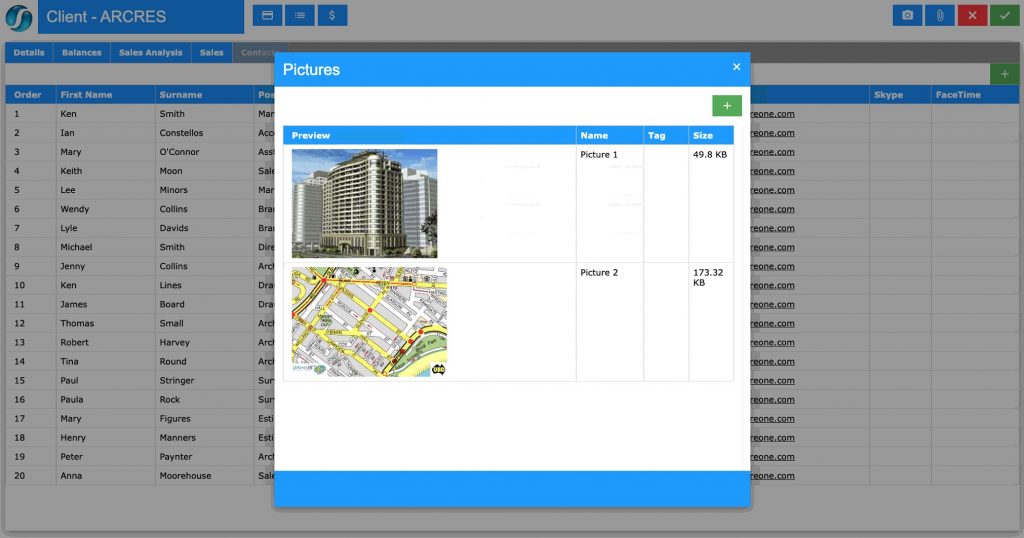
The Pictures Area allows the user to attach unlimited media to any major table record in SapphireOne. Selecting the Pictures button displays a list of digital assets currently in the data file and allows the user to attach pictures and digital assets to the client’s master record. To add a picture, simply select the New ![]() button.
button.
Client Inquiry Documents Page
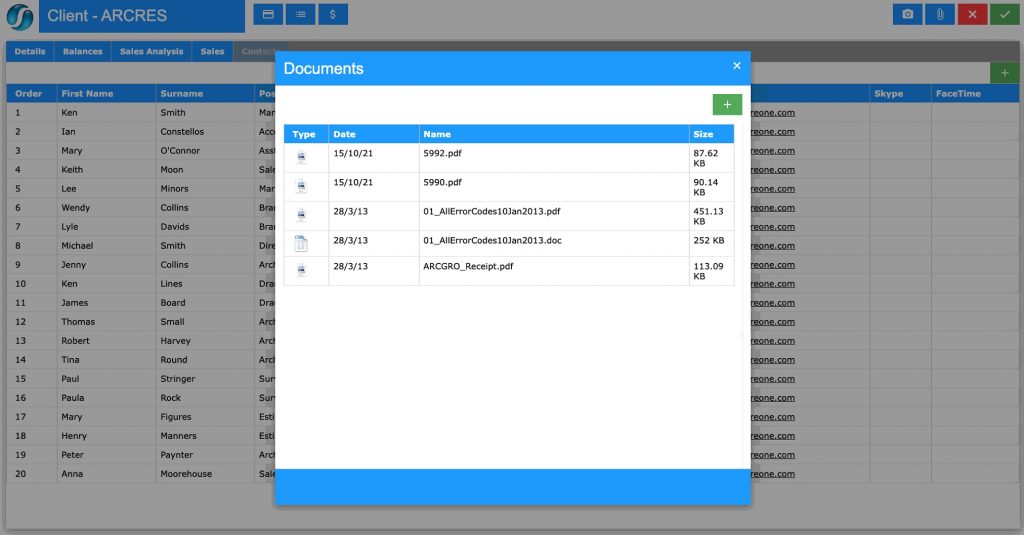
The Documents Page is used to store and record documents and information related to data entry, transactions, and master tables. Any type of document can be attached to the Documents area. Examples of document types include Adobe Acrobat files, spreadsheet documents, word processor documents, photo files, JPEGs, CSVs, HEIFs, MP4 files, and more.
Documents can be attached using drag-and-drop functionality. To use this feature, simply drag a document or file from the local computer into the Document List screen, and it will append automatically.
Client Inquiry Data Entry
The following three buttons ![]() perform a number of tasks. These buttons are outlined as follows:
perform a number of tasks. These buttons are outlined as follows:
- Client Receipt – Select the Receipt button
 to create a receipt for the client. SapphireOne will display a window ready to receive the required details for the receipt.
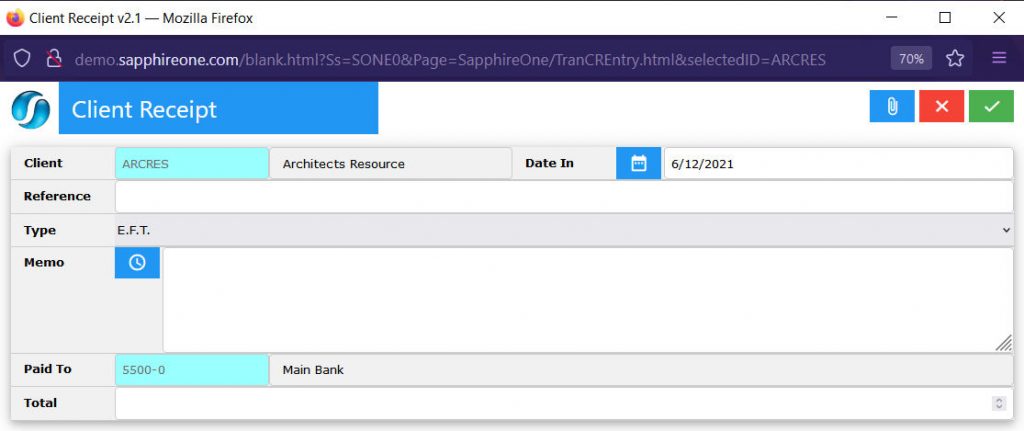
The Client ID, Date In and Type are all drawn from the Clients master file as is the Paid To Bank Account. Once the total is entered select the ![]() tick to complete processing the receipt.
tick to complete processing the receipt.
- Order List – When the Order List
 button is selected SapphireOne will display a list of recent orders from the selected client as seen below.
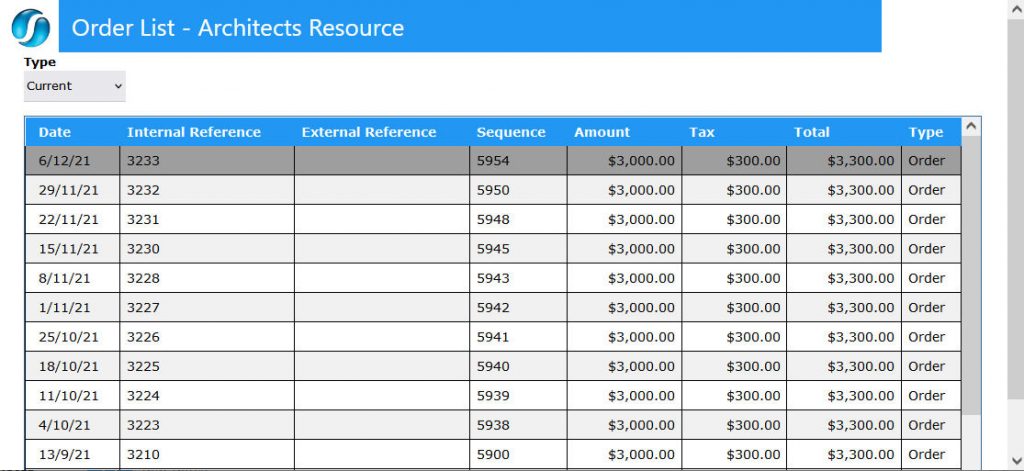
When an order is selected from the list, SapphireOne will display the order details as seen below.
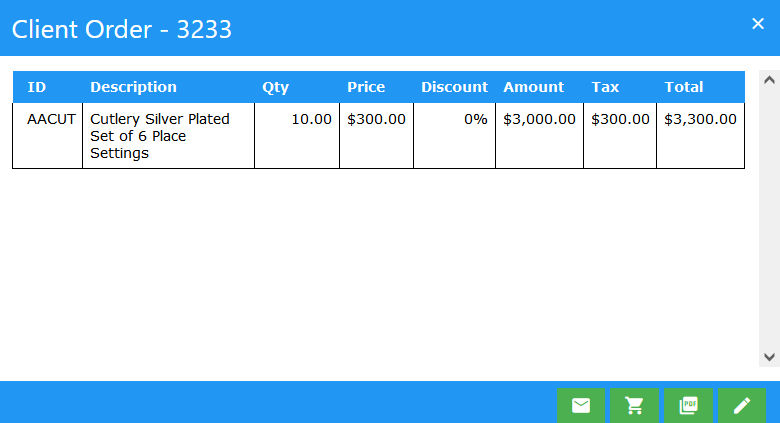
From here the user has a number of options when using the green buttons at the bottom of the window.
- Email – When the Email
 button is selected SapphireOne will attempt to send the order as an attachment to an email to the Client.
 - Picking Slip – When the Picking Slip
 button is selected SapphireOne will create an adobe acrobat Picking Slip which may be filed or printed immediately.
 - PDF – When the PDF
 button is selected SapphireOne will create a pdf of the tax Invoice for the Order which may be filed or printed immediately.
 - Modify – The Modify
 button is not used here.
- Client Sales – When the Sales
 button is selected an alert with three options will be displayed. From this screen the user is able to create new Quote Client Invoice (QCI), Order Client Invoice (OCI) or Sale Client Invoice (SCI). The procedure for entering data in all screens is identical.
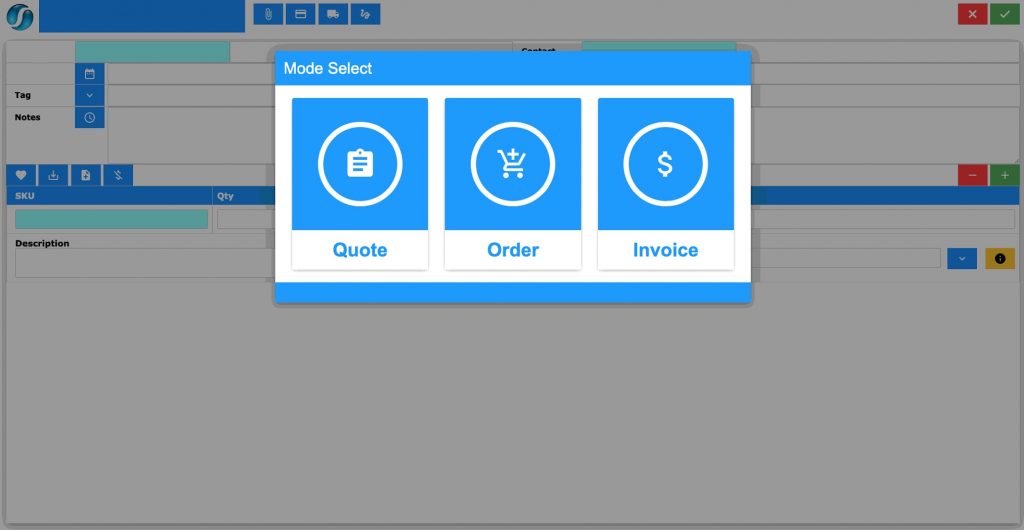
When one of the three buttons above is selected, SapphireOne will display an alert asking the user to select an Inventory item for this Invoice. If there are any alerts for this client in place, they will be displayed after the user selects an Inventory item. For all of these transactions the screen below is the same using the same alerts and procedures.
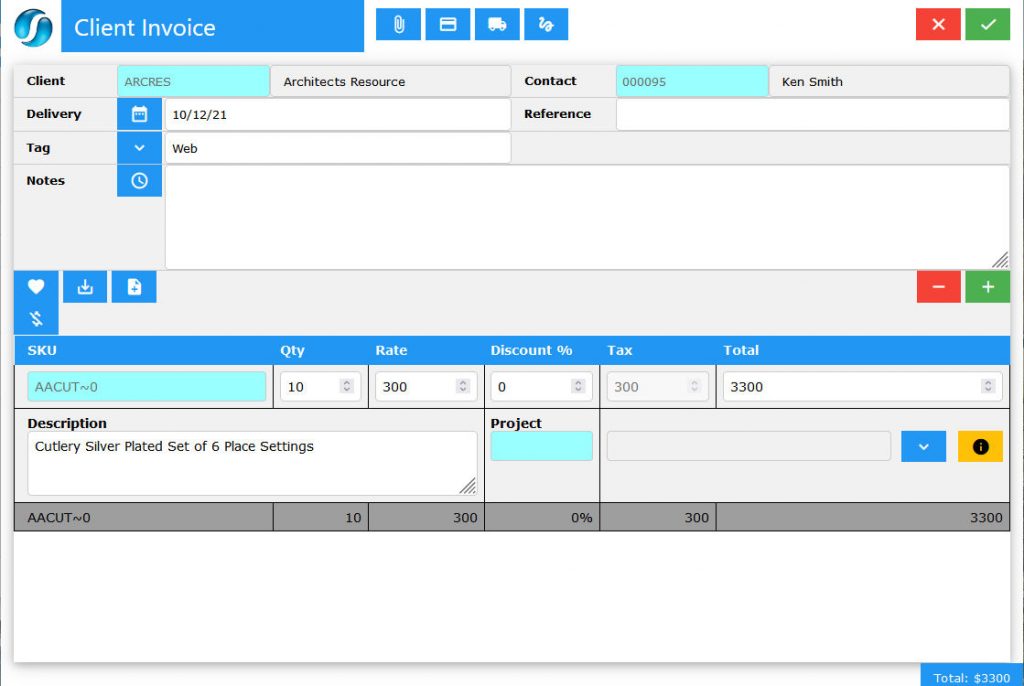
Once the user has selected an inventory Item for this Invoice, a screen will be displayed as seen below. The basic details for the Client are displayed, as well as details for the inventory item that was selected.
Client Based Buttons
There are two groups of buttons on this Quote screen and each of these perform the following functions.
- Document – When the Document
 button is selected SapphireOne will display the local machines search function allowing the user to attach a document to this quote if required.
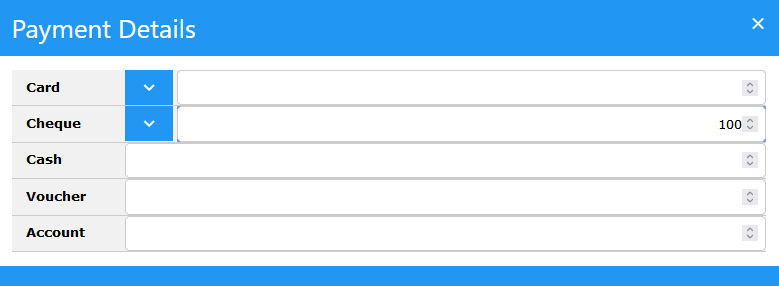
 - Payment – When the Payment
 button is selected SapphireOne will display the Payment form allowing the user to directly enter the amount into the selected type of payment as seen below.
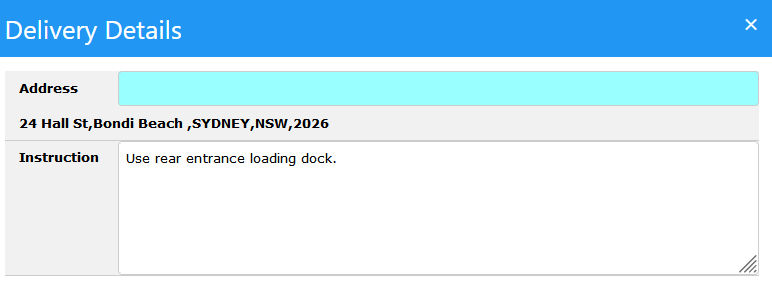
 - Delivery – When the Delivery
 button is selected SapphireOne will display the delivery form. This will allow the user to check and if necessary alter the Delivery Address for the Sales transaction.
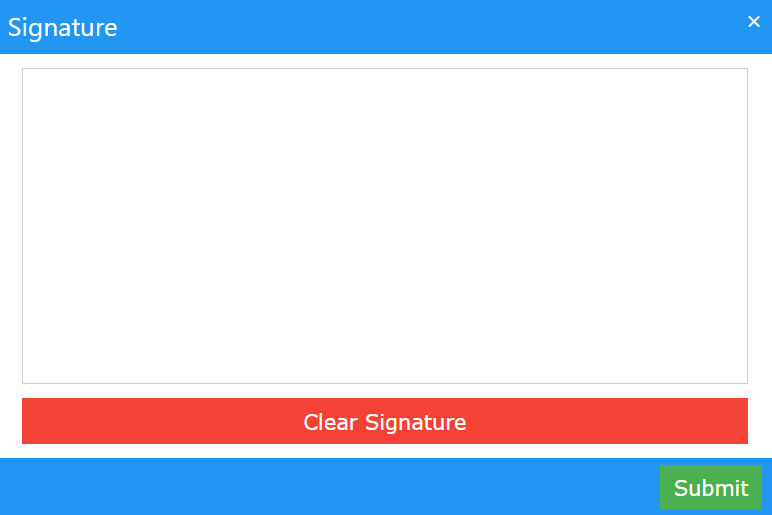
 - Signature – When a signature is required the user may select the Signature
 button. SapphireOne will display a form allowing a user to enter in a signature for the sales Transaction.
 - Add Line – When the
 button is selected SapphireOne will add an additional empty line to the transaction ready for the entry of a new line.
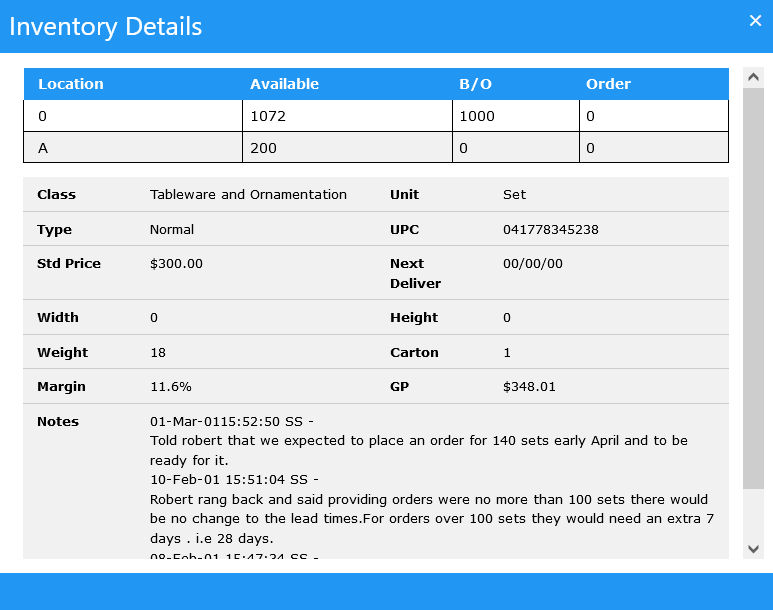
 - Info – When this More Info
 is selected SapphireOne will display an alert with additional information for the selected Inventory item as seen below.
Lines in all sales transactions may be entered in two ways.
- Direct Entry – In the SKU or ID area enter the ID of the inventory lines required. This data entry field is dynamic, allowing for a wildcard search entry.
- Selection Buttons – Use one or more of the buttons documented below.
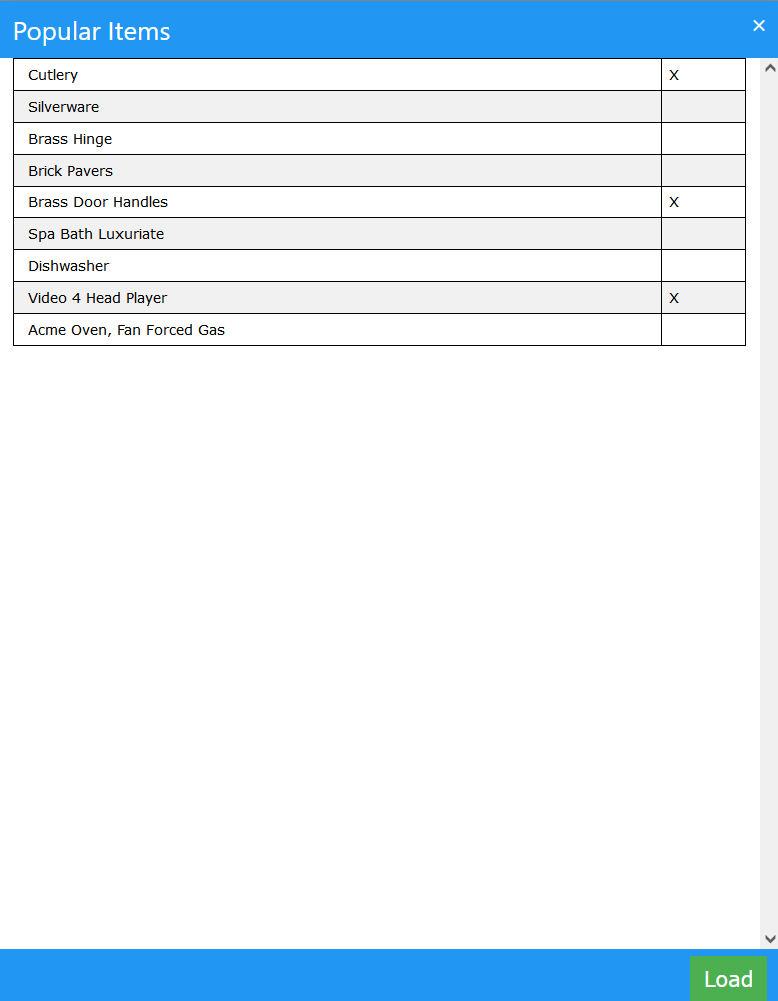
- Favourite Button – When the Favourites
 button is selected SapphireOne will display a list of the most commonly ordered Inventory items for the Client. When an Inventory Line is selected, SapphireOne will place an x in the right hand column. When you have made your selections, select the
  button to load the items into the transaction.
 - Copy Lines from past Invoice Button – when this
 button is selected SapphireOne will display a list of past invoices for the client. When one of these invoices is double clicked on the lines will be imported into the current transaction.
 - Drop Lines From FileButton – When this
 button is selected SapphireOne will open the local machines search for a file function. And what is the format of the file
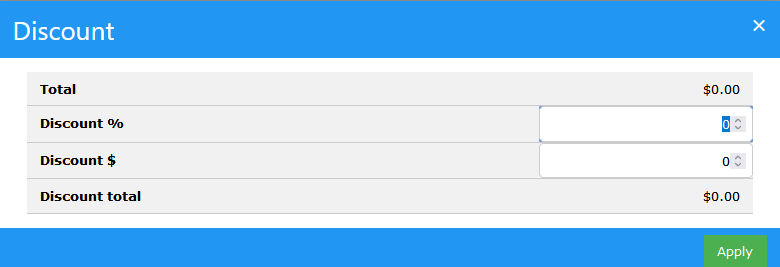
 - Discount Button – When the
 is selected SapphireOne will display a screen where a discount may be applied to this transaction. Enter the discount as a percentage or as a dollar amount.
- Favourite Button – When the Favourites
You can review our Blog and YouTube channel for additional information and resources on SapphireOne ERP, CRM and Business Accounting software.
