Bay Fix Tool Overview
This bay Fix Tool shows stock levels, as calculated from Inventory items, in the area above the bay list. These totals may be incorrect due to various factors affecting normal operations. The bay list area will display the stock levels within the bays themselves.
In setting up Bays the first task is to perform a Location Inquiry and create the Bays. You cannot assign Inventory items to Bays that do not exist. As an example, to examine the current bay details in the SapphireOne Bondi Blue testing data file,
- navigate to: Inventory > Inventory > Location Inquiry.
- Select location 0, in the Bondi Blue data file.
Note that it is a Location Inquiry and not an Inventory Locations Inquiry.

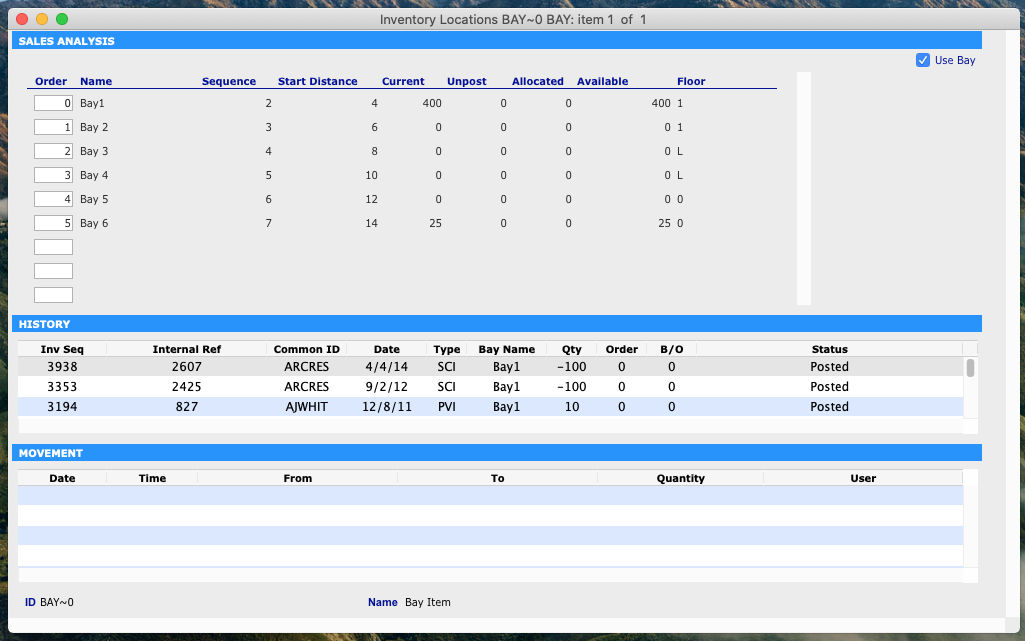
And when we select the Bay item in Bondi Blue BAY~0 the following details are displayed in the Bay Info Page in an Inventory Location Inquiry. Bays 1 and 6 contain stock.
Bay Fix Tool Procedure
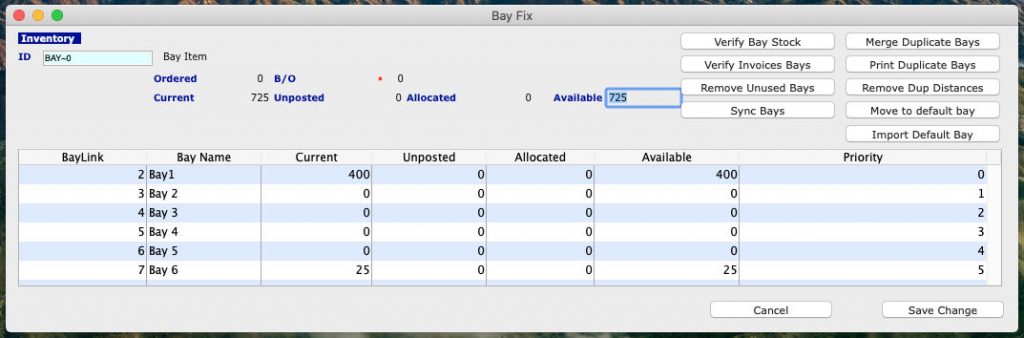
This is the screen displayed when the Bay Fix tool is select from the maintenance Tools menu:

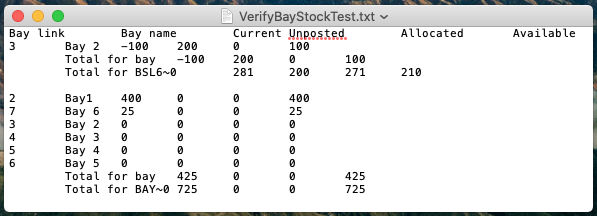
To check the Bay stock levels, select the Verify Bay Stock ![]() button. This will cause SapphireOne to display the pop up as seen to the right. It is asking the user to select a name and a location to save a file, as a tab delineated text file containing the bay details as seen below when opened using a spreadsheet program.
button. This will cause SapphireOne to display the pop up as seen to the right. It is asking the user to select a name and a location to save a file, as a tab delineated text file containing the bay details as seen below when opened using a spreadsheet program.
In the exported text file each inventory item that has bays is grouped as seen in the screen shot below. In each group the second last row contains the Bay totals and the last row has the totals for the Inventory item. Note that if SapphireOne determines that there are no errors the file will only contain the column headings.
If the numbers do not agree the user may select the Sync Bays ![]() button. SapphireOne will then display an alert requiring confirmation that “This will update all bay quantities based on the inventory locations quantities (Only items with a single bay are changed.”
button. SapphireOne will then display an alert requiring confirmation that “This will update all bay quantities based on the inventory locations quantities (Only items with a single bay are changed.”
The user also has the ability to manually adjust Bay stock levels place the cursor over the number, highlight it then enter the new number that you want for the adjustment.
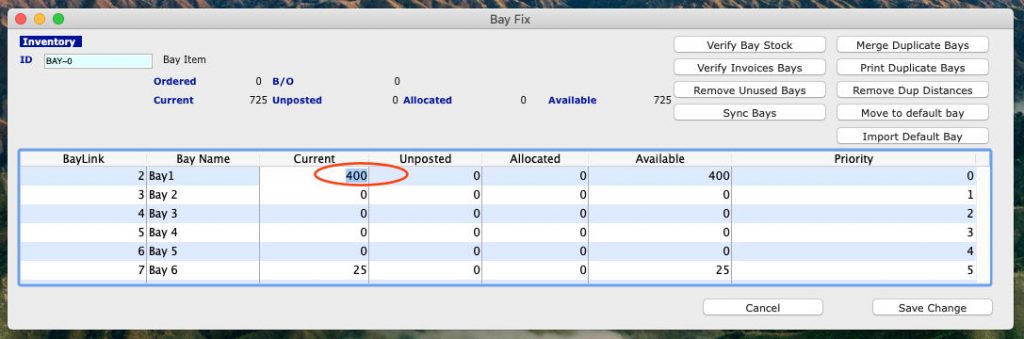
Then enter in the new stock levels for each bay as required, then select the ![]() button to permanently write the changes into the data file.
button to permanently write the changes into the data file.
Once completed you may re-run the Verify Bay Stock ![]() function to check that all is correct.
function to check that all is correct.
The verify invoices Bays ![]() button works in the same way as the Verify Bay stock function. SapphireOne will ask what the file name is to be and where to save the text file.
button works in the same way as the Verify Bay stock function. SapphireOne will ask what the file name is to be and where to save the text file.
Only in this case SapphireOne has determined that the Invoices affecting the bays have no errors, and is displaying the column headings in the text file only as seen to the left.
To correct any errors found when this function is run, the Invoices that have bays involved will have checked and any errors found in them will have to be fixed.
The Sync Bays ![]() button must only be used when there is a single Bay containing all of the Inventory items.
button must only be used when there is a single Bay containing all of the Inventory items.

This will cause the bays that contain all of the inventory items to align its stock levels with the actual Inventory stock levels as reported by the Inventory Item.
Then select the Save Changes ![]() button to save the changes.
button to save the changes.
If you use this option and if you find that some bays may be incorrect, it will cause major problems in your stock levels. Always check the result and if it is not correct immediately select the Cancel ![]() button to cancel any changes made.
button to cancel any changes made.
Bay Fix tool – Bay Management
The following buttons available on the tool screen operate as follows.
- When the Remove Unused Bays
 button is selected SapphireOne will display the alert that all bays that have no stock will be removed.
 - When the Merge Duplicate Bays
 button is selected SapphireOne will display alert “This will merge all duplicate bay Inventory record links to the same inventory” and stock held in any duplicated bays will be included as well. Please check the results of this procedure when completed.
 - When the Print Duplicate Bays
 button is selected SapphireOne will display the standard pop up for the saving of a file. This is a text file that contains ID, Bay, Order and Reference. If there are no duplicates the file will only contain the headings as listed.
 - When the Remove Dup Distances
 button is selected SapphireOne will remove all duplicate distances.
 - When theMove To Default Bay
 button is selected, SapphireOne asks for Inventory Location Inquiry and Bay name in two columns. SapphireOne will then proceed to move the item as entered to the as entered default bay
 - When the Import Default Bay
 button is selected SapphireOne will look for a tab delineated text file with just two columns. A valid Inventory Location ID and a valid Bay Name. All items will be imported to the bays as entered. It will then import these items into the default bay which will have the lowest order number!
You can review our Blog and YouTube channel for additional information and resources on SapphireOne ERP, CRM and Business Accounting software.