SapphireOne Custom Reports Expert Tips and Comments Overview
Expert Tips and Comments for Sapphire Reports are provided to address common challenges and misunderstandings in relation to the preparation and output of reports in SapphireOne.
SapphireOne Custom Reports Expert Tips and Comments – Address Field Errors
If any errors arise when using the Mailing_Address and Delivery_Address fields, users should be aware of how SapphireOne displays them in a report. The details are obtained from three areas in SapphireOne:
- The first line displays the Name as entered into the Master record.
- Subsequent lines show the address details as entered into the Master record. If a line in the address is blank, SapphireOne will ignore it and print the next line containing data in the report. This approach prevents SapphireOne from leaving blank lines in the address field of the report.
- SapphireOne then inserts any data entered into Contact 0 or 1 below the information gathered from the locations documented in steps 1 and 2 above. This issue is the most common cause of an address not being printed correctly in reports.
It is typical to place a comment below the address, allowing the report recipient to direct it to the appropriate person or department within their business. For example, “ATTN: Accounts Department” or “Attn: Name.” If this information is entered into the Name data entry field in Contact 0, it will appear as the last line in the address section of the report.
SapphireOne utilises the telephone number entered into the contact field rather than the number in the FAX data entry field of the Master record.
SapphireOne Custom Reports Expert Tips and Comments – Line Alignment

Lines that are not perfectly horizontal or vertical can be forced into horizontal or vertical alignment by selecting zero in the height adjustment data entry field when the line object is selected. This field is depicted at the bottom with a value of 12.
SapphireOne Custom Reports Expert Tips and Comments – Vertical Lines
Vertical lines can now be drawn down the entire page. Users should extend them below the working area to the point where they intersect with the top of the footer area.
If vertical lines are positioned in the repeating lines area within the body of the report, they will not render there.
The line must be drawn from the header through the body and down to where the footer will appear when printed. This process may require some minor adjustments. The recommended procedure is to get one line correct first and then select the remaining vertical lines and resize them all at once using the size data entry fields. Generally, users will make the lines the same length down the page. Users may find unwanted repeating lines in the body of a report, which can be deleted as needed.
Copying and pasting these line elements is a viable option and recommended for maintaining consistency.
SapphireOne Custom Reports Expert Tips and Comments – Offset Option for Repeating Objects
When the Repeat option is selected for an object in the body of a report, there is an Offset data entry field, which, by default, is set to 2 when the object is created. This offset is for the object relative to the top of the body section. When a font size is chosen for a repeating object, SapphireOne automatically sets the height of each row of repeating data in the report. Increasing this number results in SapphireOne positioning each row of data further down each repeated line on the page. This allows for spacing the lines or rows of data further apart down the page.
This feature is particularly useful when creating picking slips, where users need to select and check each row of data and then enter details by hand. The additional vertical spacing for each row makes it easier to read and check items off in the spaces provided in the report.
With a small amount of scripting, barcodes can be printed on reports. A barcode is a printer font, so the barcode font must be installed on the computer that will print the Sapphire Reports. A variable object must then be created on the page to enable SapphireOne to print these barcodes. Provision for printing barcodes has been made in several areas within SapphireOne.
SapphireOne Custom Reports Expert Tips and Comments – Carriage Returns
The most common requirement for this is typically when an address needs to be printed. It should be noted that the new line text, as documented above, is not necessary when a variable is used to print an address.
Carriage Returns in Text Fields
In a text field, all text is entered as a continuous string with spaces as required within the text.
The HTML markup for a new line, <BR/>, is entered at the required locations without extra spaces, unless a space is needed in the text itself.
During testing, it has been discovered that simply inserting the usual carriage return (CR) for a new line is effective. However, the user should also select the checkbox as documented below.
Carriage Returns in Scripting Areas
When entering text in the script area itself, the text must be input as a continuous string, unless a space is needed in the text, as previously mentioned. However, the markup language used is 4D-specific rather than HTML, and therefore, a carriage return is denoted by \n where required.
In the scripting areas, the ‘Wrap’ checkbox must be selected to enable SapphireOne to implement the carriage return for a new line.
SapphireOne Custom Reports Expert Tips and Comments – Cheque / Remittances
Remittances cannot be tested in utilities mode, as SapphireOne does not establish a link between the payment (VP) and the invoice (VI) in this mode. To test the reports, you will need to reprint an existing remittance from the accounts mode.
To accomplish this, follow these steps:
- Go to the Payables dropdown menu.
- Select the Payments option.
- Proceed with reprinting the existing remittance from the accounts mode.
By following these steps, you can effectively test remittance reports outside of utilities mode.
Pictures or Image Sizes in SapphireOne Custom Reports
We recommend that all images be optimised to the smallest file size possible while maintaining quality, using an image editing application.
When converting legacy reports to Sapphire Reports, users should check the file size of any images to ensure they are not unnecessarily large.
If, after conversion to Sapphire Reports, users cannot export the image for resizing, an alternative option is to take a screenshot of the image, optimise it, and then save it.
The size of images used in your report can affect print performance and the file size of your final print file. As a general rule, it is also advisable to optimise images imported into SapphireOne to minimise the growth rate of your data file.
Image Optimisation
To optimise the process, first, expand the report editor to full screen and set the zoom level to below 100%. This will create ample vacant space around the editor. Next, drag the object containing the image into the empty area.
If SapphireOne crashes during report creation, it indicates that the software cannot allocate sufficient memory to execute the Reports function, resulting in a crash.
These images likely originated as full-size pictures but were imported into earlier report versions. In some instances, they may be 5 to 10 MB in size, which is too large for a small logo on an A4 page. Usually, the images are correctly converted, but occasionally they may remain too large. If this occurs, SapphireOne may struggle to export them, necessitating the user to follow the procedure documented below.
Ideally, having a copy of the original file would be best since it can be adjusted using any image management software.
Image Pixel Dimensions Optimisation
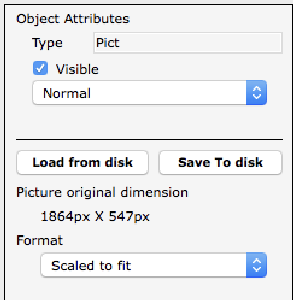
In most reports, only 1 or 2 images are needed, typically logos. Click on the image and examine the Object Attributes area, as shown in the accompanying screenshot.
Pay special attention to the Picture Original Dimension area, such as 1864 by 547.
This is an excessively large size for a logo.
Next, choose “Truncated Non-Centered” from the format dropdown menu to maintain the correct aspect ratio while displaying the image.
The image will now appear with only its center portion within the object.
Now, enlarge the object by clicking and dragging its corners until the entire picture is visible. With “Truncated Non-Centered” selected, the aspect ratio will remain consistent, allowing the image to display at its maximum size on screen, occupying as many pixels as possible. This ensures the highest resolution possible when taking a screenshot.
Capture a screenshot of the image, keeping in mind that different image formats may not reduce in size well. You can then reorganize the image using an image management tool and re-import it into the report.
The key to successful image optimisation for performance is finding the perfect balance between the lowest file size and acceptable image quality. There are three things that play a huge role in image optimisation:
Image File Format
For most website owners, the three image file formats that matter the most are JPEG, PNG, and GIF. Choosing the right file type is crucial in image optimisation. To simplify things, JPEGs are ideal for photos or images with lots of colors, PNGs are recommended for simple images or transparent images, and GIFs are suitable for animated images only. PNG images are uncompressed, making them higher-quality, but also much larger in file size. JPEGs are a compressed file format that slightly reduces image quality to provide a significantly smaller file size. GIFs only use 256 colors along with lossless compression, making them the best choice for animated images.
Compression
Image compression plays a significant role in image optimisation. Various types and levels of image compression are available, and the settings for each will depend on the image compression tool you use. Most image editing tools such as Adobe Photoshop, ON1 Photo, GIMP, Affinity Photo, among others, have built-in image compression features. You can also save images normally and use web tools such as TinyPNG or JPEGmini to compress images before uploading them to SapphireOne. Although they require some manual effort, these two methods allow you to compress images efficiently.
Image Dimensions
When you import a photo from your phone or a digital camera, it usually has a high resolution and large file dimensions (height and width). These photos typically have a resolution of 300 DPI and dimensions starting from 2000 pixels or more. Although high-quality photos are perfect for print or desktop publishing, their dimensions can still be optimised. Reducing the image dimensions can significantly decrease image file size. You can resize images easily using image editing software on your computer.
To illustrate the impact of image optimization, let’s consider an example. We optimized a photo with a resolution of 300 DPI and image dimensions of 4900 x 3200 pixels. The original file size was 1.8 MB. We selected the JPEG format for higher compression and adjusted the dimensions to 1200 x 795 pixels. The resulting file size was reduced to just 103 KB. That’s a remarkable 94% reduction in file size from the original.
SapphireOne Custom Reports Expert Tips and Comments – Importing Saved Reports
When importing a report into another data file, users must ensure that the paper size and margins are correctly set.
Importing several reports may occasionally result in SapphireOne altering these settings, which is one of the most common issues encountered.
In a new data file, a different printer will be used. Therefore, select the appropriate printer and follow the documentation provided above to proceed.
You can review our Blog and YouTube channel for additional information and resources on SapphireOne ERP, CRM and Business Accounting software.